Green Screen is a film-making technique that allows film producers to add a variety of visual effects to their video projects.
Those visual effects include replacing video backgrounds, superimposing the subjects onto various backdrops, combining animation with live acting, to name a few.
Although it is widely used in the movie and television industry, anyone can use this technology to create their own production, from short films to engaging presentations and clips, since the emergence of the apps discussed below.
In this post we will look at the top 5 best green screen apps everyone can use in 2019.
- 1. App for PC: Movavi Video Editor
- 2. App for Mac: iMovie
- 3. Apps for iPhone/iPad: Do Ink
- 4. Apps for Android: Kinemaster
- 5. Apps for Chromebook: Wevideo
1. Best Overall Green Screen App for PC: Movavi Video Editor
Free Trial Version Available, Runs on Windows and Mac platforms
Movavi Video Editor is hands down, the best app for using green screen technology. It is available for both Windows and Mac platforms and there is a free trial version available for download. Using this software is fairly simple and it is suited for both beginners and professionals.
Key Features and Tools:
- Drag and drop feature is quick and easy
- It comes with a library of pre-made video effects, allowing you to be more creative and unique when editing your videos
- Special effects include Mosaic, green screen, split screen, face-off and many more
- You can add animated titles to your production, producing unique and stunning results
- Other advanced features include zooming, video stabilizer and pan as well as reverse playback

To use the green screen feature in Movavi Video Editor:
Step1. Import both the green screen footage and the preferred background to the software.
Drag and drop the green screen footage to the video track and then the preferred background to the PIP track located under the green screen footage.

Step2. Select the green screen footage and then click on the chroma key option from the List icon on the left sidebar. When the chroma key control window pops up, the software will automatically detect the green color in the background.


Step3. All you would need to do is click anywhere on the green color, and the software would automatically remove it from the screen, leaving the subject to the forefront.
2. Best Green Screen App for Mac: iMovie
Free software (Mac only platform)
Fortunately, if you have a Mac platform, iMovie is available for free download, which is advantageous because there are not many video editing applications available for this platform.
iMovie is easy to use and can easily detect and remove the green screen from the background of your videos.No need to search out other higher-end products since iMovie chroma key option can also work for blue screen backgrounds as well.
To use the green screen feature in iMovie:
Step1. Upload both the green/blue screen background footage and the preferred background footage to the iMovie software application. Drag and drop both videos to the timeline, placing the green/blue screen over the other footage.
Step2. Ensure that you clicked on the green/blue screen footage on the timeline and then go to the top of the preview window and click the “Video Overlay Settings” button.

Step3. Select “Green/Blue screen” from the drop-down list. Your green/blue background magically disappears!

Step4. You can further fine tune the video by using thecropping tool or by adjusting the softness.
3. Best Green Screen Apps for iPhone/iPad: Do Ink
iPhone, iPad | $2.99
Green Screen by Do Ink is featured in iTunes under “Best New Apps in Education” which was designed to allow anyone with an iPad or iPhone to create amazing green screen videos. There are two options for you when using this app, you can either import a prerecorded video, photos as well as artwork or use the live video camera.
To use the green screen feature in Do Ink:
Step1. Go to your iTunes store and search for the Green Screen by Do InkDownload,installand open the app.
Step2. Once the app is open, go to the upper right corner and click on the Plus icon which would allow you to Create a New Project
Step3. Import your backgroundimage or videoby tapping on theplus icon located on the lower right corner.


Step4. Add the green screen footage to the lowest track by tapping on the plus icon located next to the track. Preview your video for shadows before you save it. If there are shadows, you can erase them using the Mask tool .

Step5. Click the Save button when you are satisfied with the result. Perfect! Your video is complete.

4. Best Green Screen Apps for Android: Kinemaster
Android, iOS | Free/ $4.99/month
KineMaster can be used on both Android and iOS devices but while it is one of the most powerful video apps available, it comes with a cost of $4.99 a month if you have used up the free trial version mode.
Like most video editing software, KineMaster can perform the basics but as a powerful video editor, it includes additional features and tools. It has chroma key, video effects, transitions, multiple video, image and effect layers, audio filter and a lot more. However, it is not as powerful as the desktop versions, but it does come quite close.
If you make a lot of videos, then this app is perfect for you. Try out the free trial mode but I can guarantee you would want to pay the monthly instalment to keep it forever.
To use the green screen feature in Kinemaster:
Step1. Download and install the Install “KineMaster” app from Google Play Store or iTunes. Open the app and proceed to the next step if you are using an image for your background. If not, skip this step and start with step 3.
Step2. You would need to set the cropping tool so go to Project Settings>Editing and then select Fill Screen. This setting prevents the background image from panning and zooming, thus avoiding an unnatural look.

Step3. Import your preferred background image or video to the primary media track by tapping on Media. Then import the green screen footage by tapping Layer>Media

Step4. Once your media has been layered, go to the options panel and tap on Chroma Key and then tap on the switch to Enablethe chroma key tool. Wala! The green color is removed immediately.

Step5. Use the Show Mask tool to further fine tune the video is you are not happe with the result. Once completed, export the final video.

5. Best Green Screen Apps for Chromebook:WeVideo
Web-based | Free with Price Tier
WeVideo is a web-based green screen technology tool which is perfect for Chromebook since there are not many software apps available for video editing and content creation. WeVideo also saves space by not having to download bulky software.
The intuitive user interface of WeVideo, makes it easy for beginners to navigate. It is a full-featured video editor so the best part about WeVideo is the template media library offering royalty-free music and sound effects complete with a pre-packaged set of effects and transitions.
Of course, more advanced features are offered in the paid package such as better text templates for titles and credits, but free users still have a great selection to choose from.
This software can practically do the entire process for you but if you do it yourself manually, you would have a lot to discover in this great web-based application.
To use the green screen feature in Wevideo:
Step1. Navigate to the WeVideo website and import both the green screen clip and a background video to its media library. On Video 2 track, which is the top layer, you want to drag the green screen footage to it. Then drag the background video to Video 1 track located underneath the green screen footage track.
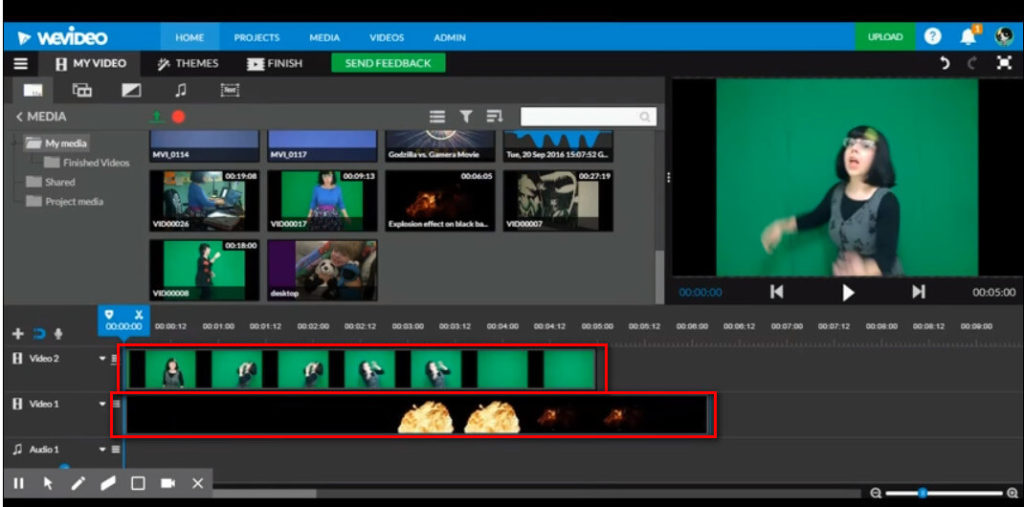
Step2. On Video 2 track (top), select the green screen footage video and then click on the Penciltool at the top.

Step3. Then, click in the eye dropper tool located on the color keying In the preview window, click on any green area part.

Step4. You would notice that the green color has been completely remove. Preview the final videoand then save it once you are satisfied.

You may also like:
- What is a Green Screen and How Does it Work
- How To Make A Green Screen: The Definitive Guide (2019)
- Top 10 Best Cameras for Green Screening 2019
- Top 5 Green Screen Software for Mac 2019 (Free & Paid)
- Top 5 Websites to Download Quality Royalty-Free Green Screen Footage
- How to Green Screen with Windows Movie Maker (2019)

Hey, My name is Paul – nice to e-meet you 🙂 I’m a freelance video editor who has over 4 years experiences of making all types of videos. I founded this website to provide step-by-step and easy-to-follow instructions to first-time editors or beginners like you who want to start their journey in video editing.

